This was difficult. My favorite animal is a panda and if I was using circles it would have been way easier. He is all black and white and I created him on paint. I was able to change the size of the triangles and color them in, but like I said I could only use triangles to make a traditionally round creature.
Archive for the ‘bunk2’ Category
Triangle Panda
Monday, June 18th, 2012CC Rally Poster!
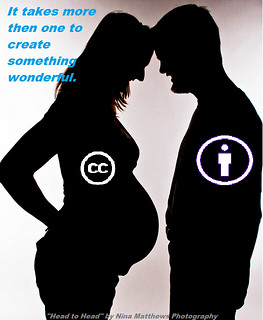
Monday, June 18th, 2012As soon as I saw the image of the kids pop up as the image for the assignment I thought, I am going to use a pregnancy photo. I knew I wanted to portray the message that it takes more then one person to create life. So I used the phrase “It takes more then one person to create something wonderful.” This was to be used metaphorically with the idea that creative commons wants people to be able to share there creations and ideas so that others may use them to well…create something wonderful! I went ahead and added in the symbol of creative commons (CC) and the symbol of the “By owner” to my photo and put in small lettering at the bottom who the photo originally belonged to. The original owner of the photo has a CC of “some rights reserved,” she just wants her name credited with the use of her photo. I then chose blue lettering for my “rally poster cry” so that it would pop out to the viewer, seeing how the rest of the image is in grey, black, or white.
Design Safari
Monday, June 18th, 2012Creative Commons
Monday, June 18th, 2012Creative Commons gives people options to their copyrights. Whenever someone creates a new work their creation is automatically copyrighted under “all rights reserved.” Creative Commons allows people to share their work with others (if they want) under different conditions. So I can allow my work to be shared, tweaked, and/or remixed by anyone or maybe only commercially and/or non-commercially. It is not an alternative to copyright, but rather works with copyright and allows for easy flexibility of the copyright laws that are automatically provided to everyone. It is FREE!!!!
From now on I plan on licensing my work under the Creative Commons Attribution-NonCommercial-Share Alike (CC BY-NC-SA). I chose this setting because I am fine with people wanting to use and expand off my ideas, as long as I am recognized for my work. I also do not like the idea of someone making a profit off my ideas, I mean I am being nice and sharing aren’t I? So I guess you could call me selfish in that aspect which is why I only want my work to be shared Non-commercially.
Helpful sites with explanations of what exactly creative commons is and the different types of CC licenses:
The Most Wanted
Sunday, June 17th, 2012Daily Create 161: Record 10 seconds of street noise.
Sunday, June 17th, 2012
Daily Create 161: Record 10 seconds of street noise.
Daily Create 160 Make a video that tells us something no one…
Sunday, June 17th, 2012
Daily Create 160
Make a video that tells us something no one ever says.
“Turn to the right.” Behold, my first animated gif! …
Sunday, June 17th, 2012
“Turn to the right.”
Behold, my first animated gif! This is from the opening scene of Raising Arizona when H.I. is getting booked by Ed. I love the Cohen brothers’ films, and this is one of their best. This is my entry in the DS106 visual assignment “Say It Like Peanut Butter.” Click the image to see a slightly larger version.
I followed various tutorials to get to this done. Jim Groom wrote a good one that gave me the overall process: http://ds106.us/wiki/index.php?title=Creating_Animated_GIFs_with_MPEG_Streamclip_and_GIMP
The first steps were to capture the video from a DVD – I used Handbrake version 0.9.6 to grab the section of the movie I wanted. Then I followed Jim’s instructions for using MPEG Streamclip to trim and export the image sequence that you then import into GIMP.
Since I have version 2.8 of the GIMP for the Mac I needed to look at another tutorial to get some of the finer details down – mainly, that when exporting the file to create the gif, you need to manually enter the .gif extension for the file name to get to the animated gif settings boxes to open. This tutorial on YouTube helped: http://youtu.be/HYrzt4hJNJs
TIP! – I found that if I optimize for .gif before I export, the file size shrunk by about half. It is good practice to conserve the bandwidth necessary for others to download or view your images if you can. To do this yourself in GIMP, once you are done and ready to export, click the Filters menu, then Animation/Optimize for GIF. Then go through the regular export process with the optimized images that open in a new window.
Maybe I need to create another now that I know how – just to reinforce the process. Or, a hundred more, to really reinforce the process?
Apocalypse Anyone?
Saturday, June 16th, 2012Design Assignments 473—Otherworldly Distortion (1 star). Take a picture of a geographical location on earth and try to alter or distort it to make it seem like its from a foreign dimension.
This was a fun and easy assignment. I started with another photo I took yesterday in the mountains of Virginia. With Picasa, I played with different filter effects until I found one with a “foreign dimension” impact. The winner was the “heat map” filter. Cool colors. I think it creates an interesting, colorful image of a post-apocalyptic world!
Mother Nature’s Mountain Rhythm
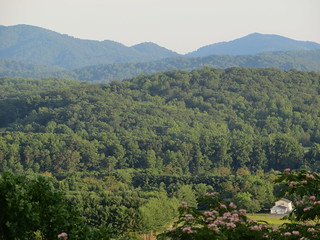
Saturday, June 16th, 2012This is a photo I took yesterday on our way back from Lexington. This beautiful mountain valley scenic overlook off of I-64, showcases Mother Nature’s design rhythm. The majestic, tree covered mountain range has a fluid movement about it, with it curves, evaluations, and spacing. It tempts your eyes to flow the curves, texture of the trees, and shapes of the mountain, with color variance aiding in the guidance of the viewers vision. You are so engrossed in taking in the rhythm of the view, that the white house in the foreground is almost an afterthought!


